Author
This article was written by ToTom.
Printable version
You can download this tutorial as a pdf
![]() Download PDF
Download PDF
Other Info
The original tutorial thread on GYBO is here in case you wish to make any queries.
Contribute
If you would like to contribute to this article, then please get in touch via the email address on the home page.
How to extract an acapella from a DVD
I'm going to explain how to extract audio from a DVD using DVD Audio Extractor, which you can find fully functional demo version following the previous link. Then I'm gonna last longer on the entirely free solution, a bit more complicated (it just takes two steps), using these 2 pieces of software: DVD Decrypter, BeSweet and its GUI, BeLight, browse them into the list.
I'm also going to give a small outline of the treatments you can apply before using the acapella you got from the extraction. I've been using Adobe Audition but a free software like Audacity will probably be as effective.
For this example, I used the Led Zeppelin DVD, concentrating on 2 songs from the Knebworth show: Whole Lotta Love and Kashmir.
Let's Begin with DVD Audio Extractor.
Normally, when the DVD is inserted, your default DVD software player is closed and DVD Audio Extractor is open, you should obtain something like this:
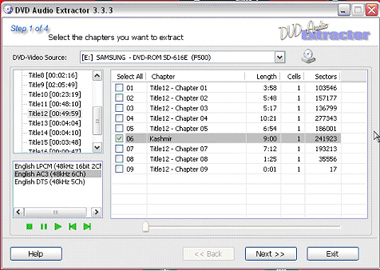
Into such a DVD with lots of parts, you have to find and identify what you're looking for (you can also extract everything in a row but it will soon occupy much disk space). Anyway, the green "player" buttons in the lower part are really helpful for that. You can also rename the songs you're going to extract so you won't spend more time to look for the song you'd like to use.
Then you have to select the right audio language, that must contain 5 or 6 channels (mention 5ch / 6ch, DTS or AC3).
Click Next

Choose Wave PCM Uncompressed format into the menu "Output Format", Same as Input for the Sample Rate (personally I prefer using conversion from a dedicated sotware), All 6 Channels, and finally, very important, 24 bits for the menu bits per sample (we'll only convert into 16 bits when the result is correctly normalised, even if we can still use the obtained acapella in 24 bits).
Next:
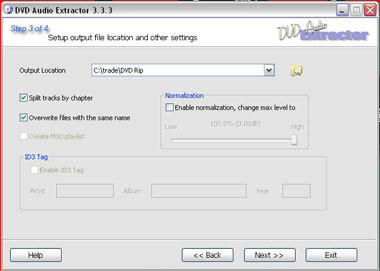
Here, you choose where you want to extract the 6 channels of the song (keep around 500 MB free, plus if it's a full concert, it counts into GB)
Here again, don't click on "Enable normalization", it's preferrable to do it with another software.
You can unmark "Overwrite Files" if you fear to erase some other files with the same name.
Next:
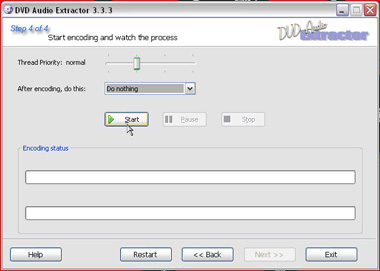
You can select another option than "Do Nothing", if you want to quit the program after extraction or extract another song.
Click on Start:
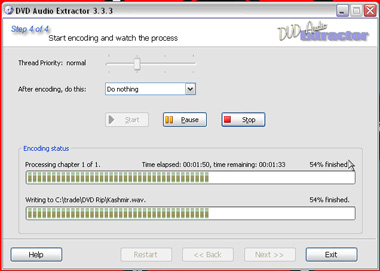
Admire.
When the extraction is over, you should be able to see in the directory you selected for the extraction, something like this:
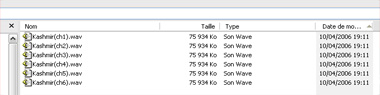
From the 6 files, you can generally keep channel 1 or 2 plus channel 3, that can contain the voice alone or almost or even not at all. Sometimes if it contains voice + drums, you only need to keep the third channel.
***
Let's see how we get to use the duo DVD Decrypter featuring BeLight/BeSweet.
DVD Decrypter is more complicated than DVD Audio Extractor and does less things, it will only extract a VOB file (containing video, different audio channels and subtitles sometimes) or, if you are willing to manage, the audio channel alone in AC3. We're gonna try to manage...
When the DVD is inserted, soft player closed and DVD Decrypter open, you should get something like this:
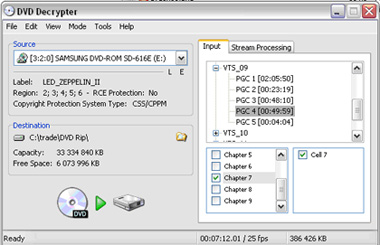
If it doesn't display the way you see it on this picture, click "IFO" into menu "Mode".
Here again, choose the destination folder.
In this example, I proceed on a chapter of the same concert as previously, and here, it's even harder to select the right song you want (the proof is I screwed up myself and chose the wrong song). However, if you get help from your usual DVD software player (like Power DVD or WiMP), you can easily find the right song without being wrong.
As we are impatient beasts who only want to get the audio from the DVD, we click on the tab "Stream Processing".
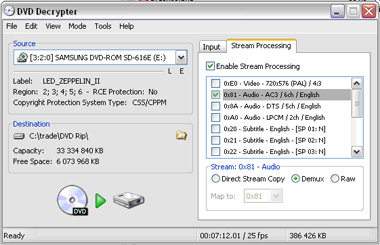
First, you click on "Enable Stream Processing", then you unclick all that's uninteresting to us, only keeping the desired audio channel. Click on Demux (short word for demultiplexing).
Click on the icon that represents the transfer from a DVD to a hard drive.
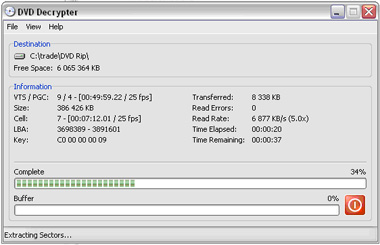
Admire; in our example, it takes less than a minute.
In the directory you've picked for the extraction, you find something like:

Only the AC3 file (that's about 20 MB) is interesting.
In the next step, you have to close DVD Decrypter and open BeLight which is a GUI (Graphic User Interface) for BeSweet.
When you install BeLight and BeSweet, put them into the same directory, it will be much easier.
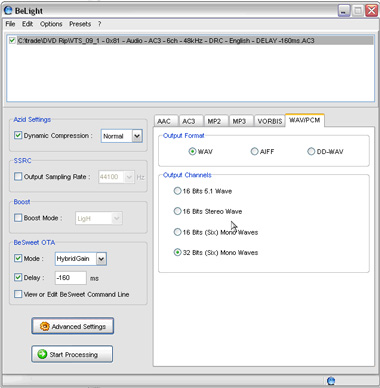
Drag and drop the AC3 file (even 2, 3 or 156 AC3 files if you like) that's interesting to us on the BeLight window.
Click on the tab WAV/PCM and select 32 bits / six Mono waves.
Normally, there's nothing else to touch. Click on Start Processing:
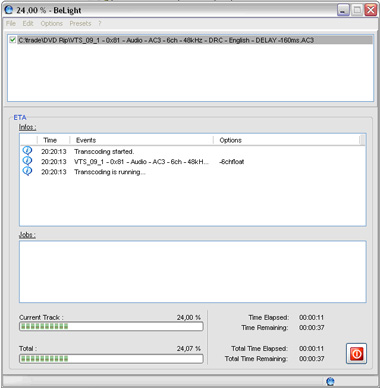
Admire.
In the same folder that contains the AC3 file, you'll find six Wave files:
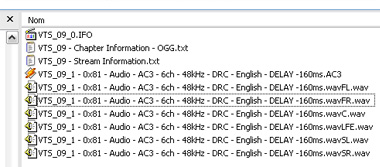
This time, only keep the file that ends with C (for Central) and, if you need it, the one ending with FL or FR (a.k.a. Front Left, Front Right).
Rendez-vous into the audio editor...
***
Before we use our files into Acid (or else), we're going to to do some treatment and edits:
I used Audition but logically, all these operations can be done using a free software like Audacity.
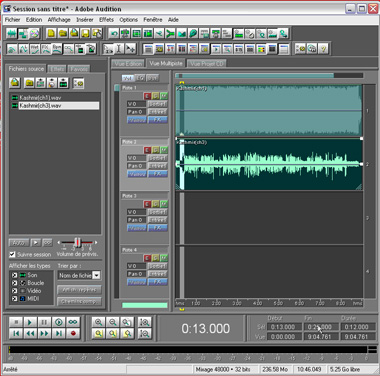
When you'll have loaded the 2 files you're interested in, you can place them into two different channels of the multitrack editor (2nd button into the first toolbar), so you can edit bits that interest you, but I think it can be worth another tutorial to explain that.
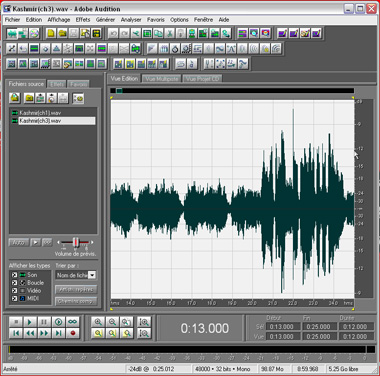
If you want to see your acapella in the edition mode (1st button 1st toolbar), you can see it's peaking at -9 dB (right-click on the vertical ruler in the right to display the unit you like). You also see there are remains of backgroud music, that makes us think that we could get rid of the ch1 file.
Let's improve our sound.
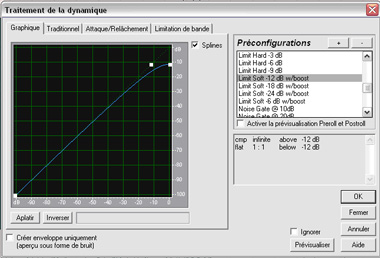
Rather than normalizing right away, we're going to use the Dynamics FX (it can be used as a limiter, compressor, expander, noise gate) into Effects Menu > Amplitude. In our case, we're going to use a -12 dB Soft Limiter (this number depends on the sound you're editing sometimes -6 dB will be enough). See the kind of curve you get if you want to apply the same effect into another software or VST pugin.
When the effect's applied, you still need to normalize (unless the limiter was enough).
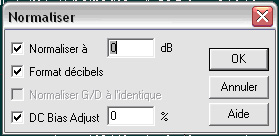
Normalize at 0 dB (well -0.1 if you want too) or 100%. Let the DC Bias Adjust at 0%.
When the sound is normalized, push F11 on your keyboard, that opens the conversion dialog box (in other editors that operation can be done in two different steps: Resample et Bit Depth Conversion):
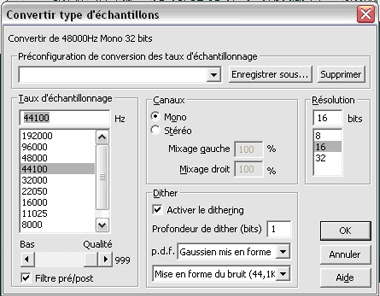
pick 44100, Mono, 16 bits.
Click OK, Save your file.
Your acapella is ready unless you want to cut it into pieces but that's another story...