
Author
Tutorial written by
Alex C for BCC.
This was written on 8th May 2006
Printable version
You can download this tutorial as a pdf
![]() Download PDF
Download PDF
Other Info
This tutorial is designed for Acid Pro - and was written on version 5. Version 6 is now out, and there is also a free version of Acid called 'Xpress'.
Contribute
If you would like to contribute to this article, then please get in touch via the email address on the home page.
A beginners Guide to Acid (Pro)
This tutorial was written for beginners using Acid 5 or above - it may
work with lesser versions. It was also written with the Windows & PC
platform in mind.
1 Where can I get Acid or Acid Pro?
That’s an excellent question, and if you’ve not got Acid yet – one you
should most definitely be asking! A quick Google search for “acid pro” will
give you a few sites, and most importantly
www.sonicfoundry.com which is the
company who used to make Acid. Since they were taken over by Sony however,
you’re not going to get far with that link.
Where you should really go is to
http://www.sonymediasoftware.com where you can click on ‘software’ and
then ‘ACID’ - taking you to precisely the right place. Sony are now the
company which manufacture and develop Acid, and at the time of writing this
article they are on version 6. Acid Pro 6.
Sony will let you download a free trial, or the cut-down Acid Xpress.
2 OK, it’s installed. What now?
After all the downloading, purchasing and installing gubbins – which you
should be able to work out yourself (after all this isn’t a lesson on
downloading software or installing such stuff) we can move on to the intro.
Acid is primarily a piece of ‘sequencing’ software. It will let you add a
number of audio tracks to a timeline and will play and export them as a
single audio file. It can be used to play more than one track at a time –
hence the attraction for bootleggers, and it can also be used to ‘beatmatch’
an audio track. Beatmatching is where you use a particular technique to
determine the ‘tempo’ of a piece of audio. It can then be placed alongside
other pieces of audio which have been beatmatched and all audio will play in
time. You will also find that Acid can handle mixing very well. With
multiple channels for volume and other effects – it’s perfect for numerous
applications.
3 The Interface – where stuff is.
When you open Acid, you are presented with an interface that looks like the
image below. What I will attempt to do here is list all the relevant buttons
and areas – so that you can refer to this and use it as an effective
orientation. I’m using Acid Pro 5 for this – but it will be similar with
most versions.
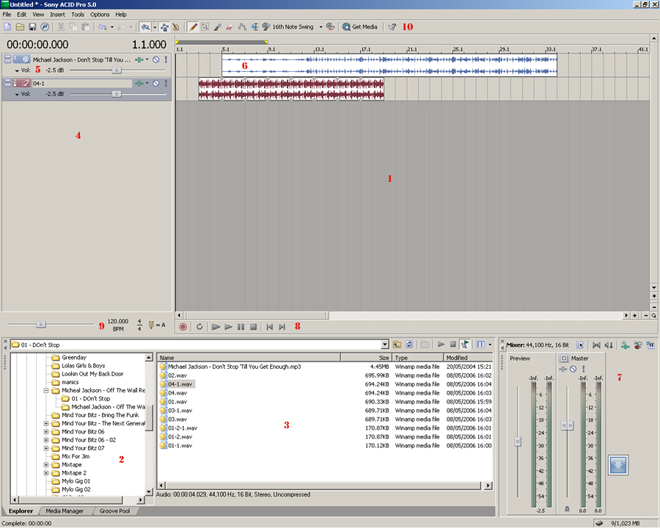
Click for a larger view.
1 – This is the main timeline. It scrolls left
and right and will go on (to the right) for as long as you require. Each of
the lines represents a measurement, although if you zoom in and out (with
your mouse wheel – or the zoom buttons at the bottom left of the window) you
will see they change accordingly – so this is more of a grid system to help
you line up your samples and tracks.
2 – This is your folder browser – you can view all the relevant files on
your drives and PC from here – and when you select a folder, it’s contents
are displayed in number 3.
3 – This is the folder view window. From here you can drag and drop audio
files on to the timeline and other areas accordingly. It also has similar
functions to that of windows explorer – renaming, moving, copying etc if
need be. When you select an audio track or sample in this window you can
have it play automatically – and if it’s beatmatched you can have it play in
time etc.
4 – This is the area for each tracks details. When you drag an audio track
on to the timeline (or this space) you get a bar that runs in line with that
particular tracks space. You can copy and paste tracks in this area as well
as delete them.
5 – This is the track details area. It gives you a volume slider (that can
be assigned to ‘pan’ or other effects). It has an effects (or equaliser)
button, a mute button and a solo button. It also has a rounded rectangle
with an icon in it. This icon will tell you whether the track is
beatmatched, a loop or a ‘one-shot’. Double-clicking this icon will give you
even more information on the track – we can detail this later.
6 – This is the audio track. It appears on the timeline in the tracks’ space
when you drag out the audio. This is when you have the ‘pencil’ tool (pretty
much default) selected – and draw the track on to the timeline. You will see
how this works when you use it practically. This audio track displays a
rough guide to the wave-form which will help you line things up and see
where the track is louder or quieter etc.
7 – This area holds your volume and levels info. It will show you how loud
your mix is and also how loud your previews are playing in comparison. There
is also a ‘project properties’ button here – where you can set a few general
settings.
8 – This is your main timeline controls. Record, loop, play from start,
play, pause, stop, go to start and go to end. Most of these speak for
themselves. The record button I won’t be covering as I’ve never used it! The
loop button relates to the blue bar at the top of your main timeline area –
it’s draggable and means you can hit play and loop a section while testing
different samples in the folder window.
9 – This area also provides some general controls. The main slider and
numerical display is the project tempo – this is how fast or slow it is. As
a very rough guide I’ve detailed some average BPMs (beats per minute) below…
Trip Hop 70 – 80
Hip Hop 80 – 100
Pop etc 90 – 120
Easy House & Big Beat 110 – 130
Dance & Breaks – 130 150
Faster Techno & Hard House 140 – 160
Drum & Bass 170 – 180
120 bpm is the default.
10 – This is your standard menu bar that sits below the ‘File’ etc options
you’ll see on most applications. It has things like new, open, save, publish
and so on. It is also where you can select the pencil tool if you don’t have
it. Pencil tool, rubber and the select tool too.
4 Putting something in: Adding sound.
OK, so we should probably try and put something in. A good place to start
would be an mp3 or wav file. I’m assuming you have some of these already (if
not, then at least some samples) and that you know where they are on your
PC.
So browse and find them in your folder views then when you have them – drag
one on to the timeline. Now, it depends on what length the track is – as to
what will happen here.
If it’s a short sample it will treat it as a loop. This means that it will
automatically try and set it as a loop to the bpm you have on the project.
This can be a good thing if you’re using drum loops or something that is
looped well – but is a pain if it’s a short speech snippet. I’ll explain how
to fix this in a moment.
If the sample is a long sample it will bring up a dialogue box asking you if
you wish to beatmatch the sample. If it is an entire track – then chances
are you probably will want to beatmatch it. I’ll go on to explain the
beatmatching process in the next section. For now, let’s treat it as if you
don’t want to beatmatch it – perhaps it’s a long ambient sound and you want
it to play through.
Pressing cancel on the beatmatch option or dragging in the right length
sample will be treated as a one-shot. This means the track is played once at
its own tempo – regardless of your project tempo. You can have it play as
many times as you wish – but you have to drag out each instance – as opposed
to a loop which you can drag out continuously.
- Changing loops to one shots and more
OK, so you’ve dragged in a sample that you want to be a one-shot – but it’s
decided to put it in as a loop. To fix this you should double click on the
track’s icon (the coloured rounded rectangle with an icon in it). This will
bring up the track properties box which will look like the image below.
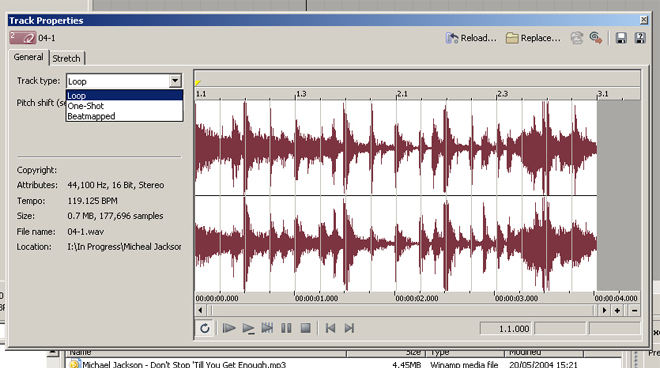
Click for a larger view.
Use the dropdown menu displayed to change your
track to the desired type – then close the dialogue.
5 Getting down to business: Putting it all together.
This is the part that may require some sense, musical knowledge and a good
ear. If you’re tone-deaf, and have no clue with regard to song structure,
key or any sort of musical theory then don’t be surprised when your tracks
come out sounding awful. Acid Pro can facilitate your audio production, but
it can’t make your production for you – it’s just a tool, not a generator.
OK, so you know how to add tracks to the mix. I guess I should mention that
to remove them, you can either click on the sample you’ve dragged out and
hit the delete key – or you can delete the whole track by hitting the track
icon and pressing delete. This also applies to the copy-paste stuff too.
So you’re looking to build up your first bootleg? – I’ll assume you’re a
mash-up producer, but very similar principal applies to those making
sample-based original work (if that is even possible) I won’t be covering
any sort of midi-input at this stage. Firstly because it’s not as important,
but secondly – because I’ve yet to get to grips with it myself.
I guess the format for bootlegs is generally 2 tracks working together to
create something new. This can be an instrumental and an acapella, or
perhaps 2 instrumentals, or really any sort of combination you see fit. It’s
your work after all.
It’s a case of dragging beats and samples on to the timeline, ordering them
as you wish – then playing it back to see how it sounds. It then becomes a
trial and error process, with probable input from other samples through your
folder view.
- Beatmatching
This is, as mentioned before the process of determining the tempo (speed)
and bpm (beats per minute) of a track, so that when you beatmatch two tracks
and run them back to back – they play in time (or at least at the same
tempo) if you’ve done everything correctly.
If you want to beatmatch a track – then you can drag it into the main
timeline. If it is a long enough sample or tune – the beatmatch dialogue
will appear automatically and as if you want to beatmatch the track. This
way you can press yes and get on with it.
If you need to beatmatch from a track that isn’t long enough, or perhaps you
didn’t want to beatmatch it before – you can double click the track icon and
bring up the track properties box – then from here select “Beatmatched” from
the drop down box. You can then click the ‘stretch’ tab and then the
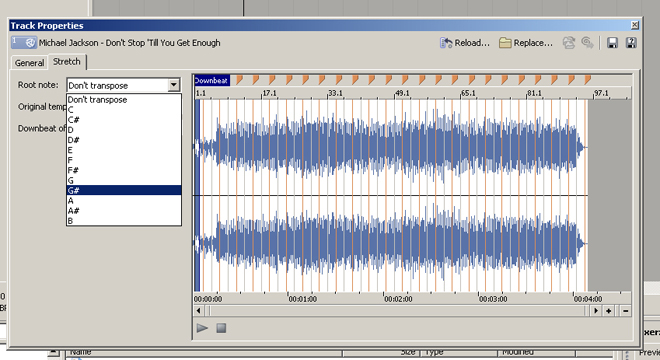
“Beatmapper Wizard” button. This will bring up the dialogue for you.
OK, once in the dialogue you are presented with the sample and you are asked
to specify the downbeat of the track.
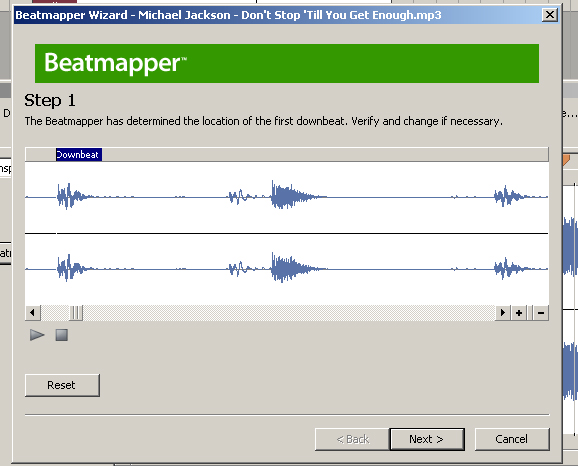
Click for a larger view.
The downbeat is the first beat of the first bar.
In most cases this is the first of 4 beats in a bar. Most dance tracks have
four beats in succession, and the track is made on multiples of four. If you
count a track, you can often count all the way through but only using
numbers 1 – 4 in order.
Acid can get this downbeat detection wrong on tracks – especially if there
is an intro, or any sort of sound before the first beat. As a result you
should always check it’s right. Press play and find out where the marker
plays from. If it’s wrong – adjust it so that it’s on the first beat. Don’t
worry if you loose the intro, as you can deal with this when the track is
beatmatched.
Once you’ve selected the downbeat press next, and Acid will try and estimate
a single loop, or bar of 4 beats. You can drag either end of this (although
if the downbeat’s right just the right end will do) highlighted bar to
properly line up the lines with the beats in the bar.
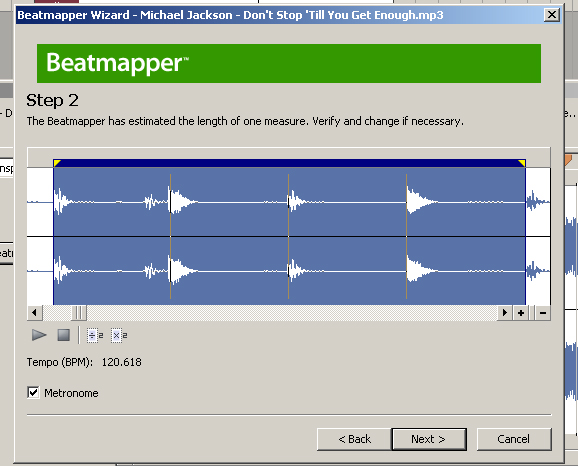
Click for a larger view.
If you press play to preview, you will hear a
tick-tock sound of the metronome – this is what you should line up with the
beat to make sure it all fits.
Once you have done this press next and you will be asked to check it all
fits with the rest of the tune. This is where you can find out how well the
single bar you just finalised is projected along the length of the entire
song.
You use the slider or arrows at the bottom to move along the entire track
and find out if every bar is in time. Often the bars will go slightly out of
sync, and it’s just a case of dragging one end of the particular bar to the
right place – this will effect the rest of the track to a degree but should
keep it all in time more accurately.
You will get used to this process and also find that some tunes just can’t
be beatmatched very well – then your enjoyable task is cutting it all up in
another program like Soundforge into more manageable pieces that can be
looped or beatmatched more accurately.
Anyway – back to this. You finalise the entire track (or as much as you feel
necessary) and then press next. You are presented with the finished screen
and three tick-boxes.
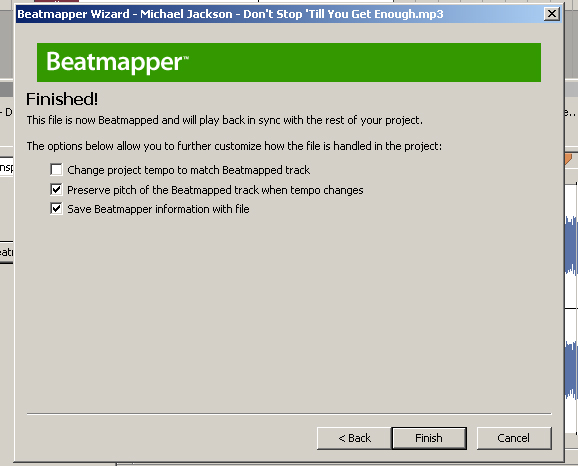
Click for a larger view.
The first box is “change project tempo to match
beatmapped track” – this will take the tempo of the track you have just
beatmatched (or beatmapped as they say), and apply it to the project – so
the project tempo will become the same as the beatmapped track. If I’m
working to a specific tempo or have already beatmatched other tracks – I
leave this unchecked.
The second box is “preserve pitch…” this will keep the sounds in the track
the same whether it is slowed down or sped up. The alternative is hearing
the sounds get lower as you slow the track and higher pitched as you speed
it up – which is no use if you are wanting to set the key to match something
else. So check this box.
10000
Spoons contributes:
No, the alternative is not having loads of horrible burbly artefacts and
wonky rhythms and other assorted timestretchy shit because Acid can't handle
pitch shifting well at all. I've lost count of the number of boots and mixes
I've had to throw away because of shit sound quality caused by ticking
"preserve pitch".
Don't do it kids! (or if you have to do it, use Ableton Live, which is far
more useful at these things)
Oh, and if you want to set the key to match something else, choose something
else that's in key at the same tempo. Not that hard, you've got at least a 1
in 24 chance of hitting the jackpot - less than that if you're not too
bothered about major/minor keys.
The final box is “save beatmapper
information with file” this just means that the information on the
beatmapping you’ve just done can be applied to other projects if you want to
drag the same file into another project – perfect! So check this box.
OK, now you’re done – you can drag the track out and with a bit of luck it
will be in time with the loops and other beatmapped tracks you want to put
in to the timeline!
The other thing worth mentioning here is any part of the intro you’ve
chopped off. If there were sounds before the first beat that you want to get
back – then when you’ve dragged your sound out – you can go to the start of
the sample and drag the edge the other way to reveal the pre-first-beat
sounds. The rest will stay in time and you’ll have your intro.
Bear in mind if you do this, then if you want to move the whole sample/track
about – it may go out of time, as the intro will snap to the grid on the
timeline and you will have to delete it and drag it out again in the right
place. You’ll get the hang of this after it’s been done a couple of times.
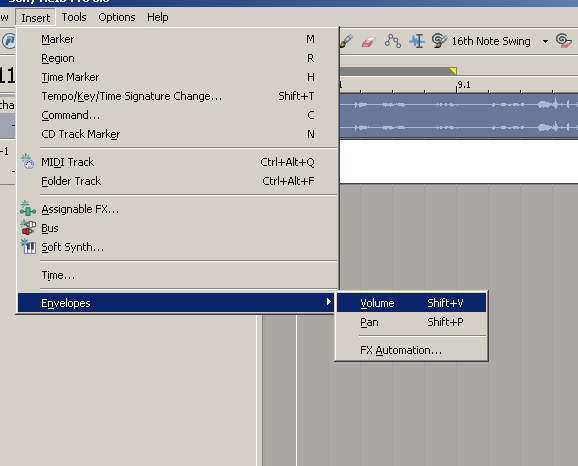
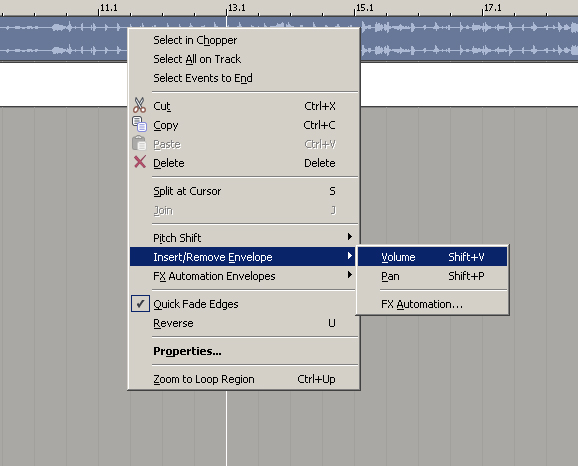
- Volume levels and envelopes
Every track has a volume level – this applies to the whole track and is just
a single setting. You can also apply a volume envelope to the track to fade
things in and out. To do this you can do a couple of things.
Right click the track and go to insert/remove envelope – then ‘volume’. OR
use the menu at the top to hit Insert > Envelopes > Volume. OR finally you
could just hit “[shift] & [V]”. These three techniques will also remove the
envelope if the need arises.
Click for a larger view.
Click for a larger view.
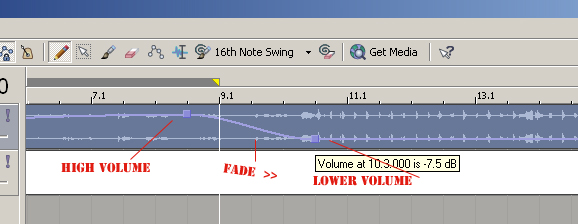
When you do this you’ll get a blue line across
your audio track. This is the volume level. The default (around the middle)
is 0dB (zero decibels) Which means the envelope makes no difference to the
track volume.
Now, to create a fade you have to double click on the line where you want it
to start or end. This will add a small box to the line which you can move
about. If you move it up, the volume increases, if you move it down the
volume decreases. TO have a fade you need 2 boxes – so double click to add
another then you can move one to the top and one to the bottom to produce a
fade effect.
Click for a larger view.
As a last note on this – if you remove an
envelope from a track after putting in fades and these key-points (the
boxes) then you will loose them all and have to re-do them if you put the
envelope back in.
- Keys and pitch.
The key of a track is it’s ‘base note’ If you don’t have any musical
knowledge, then you should know that all music (or at least most) is created
in a specific key. All notes have a key and there are the letters A to G to
denote these keys.
A piano for instance has a number of keys. They run from A to G all the way
up or down. This diagram details that.
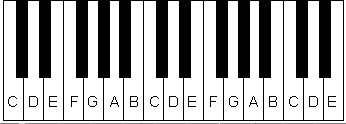
The black keys are ‘semi-tones’ the white keys are tones, or notes.
Semi-tones are referred to as ‘sharp’ or ‘flat’ for example, the black note
on the diagram to the left of the keyboard can be referred to as C-sharp or
D-flat. The black notes are sharp to the note below them or flat to the note
above them. The next note from the left would be D-sharp or E-flat. The
other thing to note here is that ‘sharp’ is known by the ‘#’ symbol and
‘flat’ is known by the ‘b’ symbol.
Although this isn’t too important – it will explain a few things in a
moment.
So every tune will have a note that harmonises with the rest of the tune. A
note that is the root note for the track. It’s difficult to explain this to
somebody with no musical knowledge so if you want to learn more about the
whole key explanation thing, then it would be wise to search for some basic
music theory somewhere.
OK, so you have 2 tracks lined up and playing at the same time, but they
don’t go well together, so you might be able to fix this. If the vocals
perhaps sound a bit out of tune on your acapella and perhaps if they were a
bit higher they’d work – then you can open the track properties (double
click the rounded box/icon for that track) and try to fix this.
In the ‘stretch’ tab you will see another dropdown box that has the letters
A to G as mentioned above with corresponding sharps and flats too. This
means that you can make your sounds higher or lower with this method. By
selecting one of these and then going back to see how it sounds you can
match two tracks.
Click for a larger view.
Now, merely making both tracks have the letter G
won’t do anything – it will just pitch them both up. You have to make
relative changes, because although the key letters will change the track –
they only relate directly to that one track, as opposed to the other tracks
too.
This can be a difficult part to master, so it’s worth a bit of trial and
error to get you orientated with it all.
For more accurate adjustments to this you’ll see a pitch shift (semitones)
box in the track properties – here you can have up to 3 decimal places on
pitch shift. 1.000 = a single semitone, and 12.000 will equal an ‘octave’
which is 8 notes. G (through A) to G. you can also use negative numbers here
to express a pitch down.
6 Getting something out: Saving and rendering.
So you’ve constructed your masterpiece, and want to make sure the world can
hear it. First you need to render it.
What I would do is make sure all your volume levels are ok – make sure it’s
the same volume at the end as at the start of the mix etc. Basically just
check it through to make sure it sounds ok.
Now, you can save it. Now, File>Save will let you save the Acid file – which
holds info about the project – and this will also save a backup of the acid
file alongside it. This is for recovery purposes if Acid crashes.
This however won’t get you an mp3 at the end. What you need to do for that
is use the File>Render As… option. A box will come up asking for a filename
and then you have a few options for rendering the file – you can chose mp3,
wav and various other formats. Mp3 is the most common as you probably know
already and as far as bit-rates go – that’s a whole other discussion.
Generally you should render a wav (windows – not the scott-studios one) file
for a master copy (although this will take up more space on your hard-disk)
and also render an mp3 file for sending to people on the internet or posting
on websites etc. The wav can be used to make more copies and also to write
CDs.
So there you have it – a beginner’s guide to Acid.
All the best…