
Author
All credit for writing should go to Phillip Meehan.
Printable version
You can download this tutorial as a pdf
![]() Download PDF
Download PDF
Other Info
To hear mp3 samples used in this tutorial, and the mashup created with the tutorial click here.
Contribute
If you would like to contribute to this article, then please get in touch via the email address on the home page.
mashing For beginners - Tracktion Tutorial
Thanks to Phillip Meehan, I've been lucky enough to bring you this tutorial covering 'how to create mashups' using Tracktion.
Overview
The term "mash-up" or "bootleg" (or, more commonly, just "boot") describes
the result of mixing together two or more records to create a whole new
track. Though originally performed live using turntables and DJ mixers,
recent advances in sequencing software have taken this art-form to a whole
new level. This document outlines how mash-ups can be made using the
software package
Tracktion.
Introduction
The first step in creating a mash-up is... to have an idea... Though it is
certainly possible to simply start intercutting and overlaying two favourite
tracks, you have to ask yourself "why?" The best (and most successful)
bootlegs to date have cleverly juxtaposed two records that should not even
be in the same record collection, let alone the same mix, which are then
combined to sound like a totally original piece of work.
One of the finest examples of this is Freelance Hellraiser's "Stroke of
Genie-us" which combined a home-made instrumental of The Strokes' "Hard to
Explain" with an acapella vocal track from Christina Aguilera's "Genie in a
Bottle". The end result made a great dance track, made the listener smile,
and - to my ears at least - sounded a whole lot better than either of the
original tracks.
Okay, so you've got an idea of which tracks you want to start cutting
together. Ideally, one of them should be an acapella (a vocal-only version
of that track) which you can often find on vinyl releases of singles, or as
bonus tracks. The internet is a great way of digging out these versions of
songs - spend just a short time browsing around and you should be able to
find unmixed, unprocessed vocal tracks from records by a huge number of
artists available for download. File-sharing programs such as
Soulseek* are a great
way of seeing 'what's out there', too.
The other useful element is an instrumental version of one of your tracks.
Again, instrumentals are often available as bonus tracks on singles, but can
also be created by processing the vocal version in Tracktion - more on this
later. First things first, let's get that tempo going:
1. Setting a tempo grid
Trying to edit/remix complete mixes without first making an accurate tempo
grid is like going hiking without a map. Not only will it take much longer
and you'll get lost, but you might stray onto a firing range and get shot.
Start with an empty edit and either import your stereo file onto track 1, or
import the song directly using Tracktion's "import from CD" option. First of
all, cut any intro or lead-in off the clip so that it comes in at the start
of a verse or chorus, and on a drumbeat (you'll see why in a moment).
Tip: Tracktion has lots of ways to cut a clip on an exact drumbeat. You
can double-click the clip to preview it, then click-and-scrub with the mouse
and press the backslash [ / ] hardkey when you're on a drumbeat, or - my
preferred method - double-click and mouse scrub to find the drumbeat, press
the spacebar TWICE to stop playback, use the mousewheel to zoom in on where
you stopped and simply use the waveform display to cut the clip just before
a drumbeat.
Mark the start of the clip by tabbing to it (using the
[PgUp] and [PgDn] hardkeys) and pressing the [ i ] hardkey
to define the in-point of a region). Now, play for 4 or 8 bars and mark the
out-point of the region using the [ o ] hardkey). To make sure your
region is spot-on, put Tracktion into "loop" mode and listen carefully - if
the loop seems slightly 'out' then you can zoom into your out-marker, drag
it slightly and listen again.
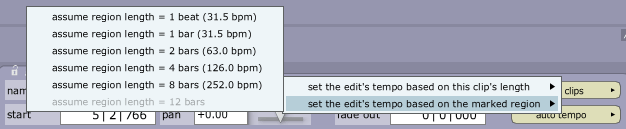
Once you've set your region to be exactly 4 or 8 bars (or as close as you
can get it) click on the auto tempo button in the Properties panel
and select set the edit's tempo based on the marked region. A pop-up
list of tempos will appear, and yours should be the one next to assume
region length = 4 (or 8) bars. As a guide, see what the expected tempo
in brackets is - if it's roughly between 80 and 140 bpm then that's probably
correct, if it's a lot more or a lot less then perhaps your marked region is
either longer or shorter than 4 or 8 bars - either click a different bar
length to give an appropriate tempo, or remake your region to be exactly the
correct number of bars and try auto tempo again.
Here's the first exciting moment... turn on Tracktion's
click track and press play - with luck, the clicks should be exactly in time
with your imported track. Listen for a minute or so, as the click will very
likely start to drift very slightly. Don't worry, this is normal!
If your tempo is drifting out after 10-20 seconds or so, simply press
timecode and change tempo/time signature and see what the bpm was
calculated as. If it's a number like 125.92 or 118.06 then try rounding it
to the nearest whole bpm - a lot of modern music is created on sequencers
where the composer typed in a whole number to begin with! Before playing it
back against the click to see if it's more in sync, remember that changing
the tempo will have moved the clip's start point, so click on the clip and
set its start point to be (anything) | 1 | 000 (now that's why you
cut the beginning off the clip earlier!) Press play and see if the click is
tighter - if not, continue to nudge the tempo (and start time) until it
remains in sync for 30 seconds or more.
Tip: Don't bother spending a whole day 'tweaking' your tempo - get it
about right and simply put cuts in the clip every verse/chorus and pull it
back in sync at those points. Trust me, if your tempo was close to start
with, you'll never hear these little resync-edits when you play it back!
When you've established your tempo grid, trim the beginning of the track
back out so that your base track is now complete (and in sync with bar/beat
gridlines and the click track). This makes editing/syncing up of material
against your base track much easier - just turn on snap and everything will
just, erm, 'snap' in sync.
2. Removing vocals
As was mentioned earlier, the best base track for a mash-up is an
instrumental version of a well-known song, but if you can't find one, and
it's too much work to construct it from re-edited middle-8s, intros and
outros, it is sometimes possible to remove (or at least attenuate) the
original vocal track - here's how, but first, concentrate - here comes the
science part:
Normally, the vocal part of a song is (a) mono and (b) panned centre
(this is, of course, a massive generalisation, but still holds true for a
large amount of recorded material). With a stereo recording, there is no
'centre channel' - if you want to pan something into the centre of the
stereo image, you simply add the same amount of it to both the left and
right channels. A centre-panned vocal track, therefore, is on both the left
and the right channel, at exactly the same level and with the same EQ etc.
So by inverting the phase of the left channel and adding it to the right,
this will effectively cancel out any centrally-panned mono component of the
song and leave just the rest of the stereo image.
Phase-reversal is a tried and tested technique that can actually give
surprisingly good results. Where it falls down is when there are stereo
effects (particularly chorus and heavy reverb) applied to the vocals.
Phase-reversing the track cancels out the mono vocals, but will leave the
stereo reverb 'wash' uncancelled, which may be too obtrusive in many cases.
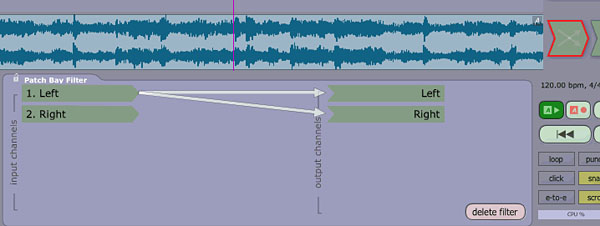
Here's how to phase-reverse in Tracktion:
Copy your base track (on track 1) to another parallel track - the easiest
method for doing this is to select Track 1's name field at the left of the
screen, and simply press [Ctrl]-[C] then [Ctrl]-[V]. On this
parallel track (track 2), drag down a Tracktion EQ filter, followed by a
Tracktion patchbay filter. Click phase invert on the EQ filter and
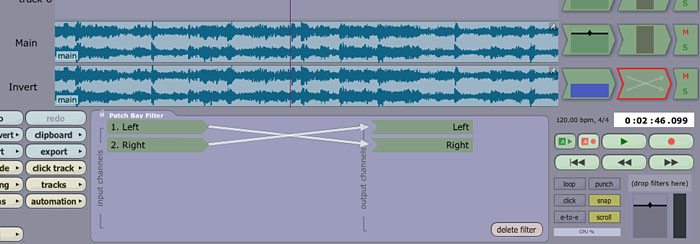
swap the left/right channel assignments on the patchbay filter (as below):
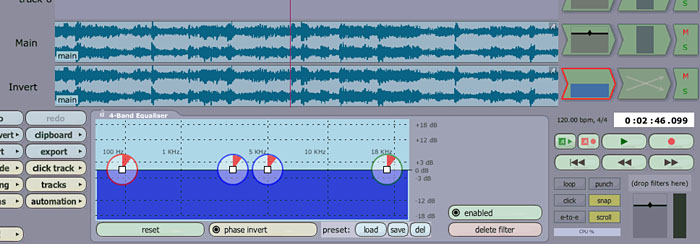
For this to work successfully, both tracks should be at an identical level and with no other EQ or effects. If you change the volume of one of the tracks, you'll notice the vocals creeping back in. As was mentioned earlier, this technique can give very good results on some recordings and particularly poor results on others, and, because it relies heavily on phase-correlation between the Left and Right channels, might give unexpected results with tracks that have been previously-compressed using a compression system such as MP3 or Ogg-Vorbis.
Note: Though this may not be of great concern to most people, it should be pointed out that the technique described above produces stereo tracks that are 180° out of phase, and therefore disappear completely when played in mono! If mono-compatibility is a problem, another patchbay filter can be used to turn the vocal-less track into a mono signal, as shown below:
3. Acapellas
As was mentioned earlier, a surprising amount of unaccompanied vocal tracks
of famous songs have found their way onto the internet. These are generally
referred to as "acapellas", which I believe is Greek for "in the she-goat"
(though I might have got that wrong).
Unfortunately, whilst the section above dealt with the removal of vocals
from a complete mix, the reverse is sadly not true - there is simply no easy
way to isolate the vocal track from a complete mix. One method which may be
worth trying (but will almost cerainly fail!) is if you happen to have a
full version and an instrumental version of a track. Using a similar
phase-reversal technique as outlined above (but without the Patchbay
channel-swapping), you can turn the instrumental track out-of-phase and add
it to the full track, which - in theory - will result in the total
cancellation of everything except the vocals, leaving you with an acapella.
In practice, it's virtually impossible to align the two recordings
accurately enough, which just leaves you with a big, phasy mess, but you
could give it a go...
Assuming you've come by a vocal-only mix of a record, the next thing to do
is to try it up against your shiny new instrumental, which you created
earlier. A lot of these "unofficial" acapellas are MP3s - which Tracktion
currently doesn't import - so first you have to turn them into WAV files.
Strangely, not all audio software packages let you do this, but if you have
a CD-writing program, have a close look as MP3-WAV conversion is actually
built into a lot of CD burning packages (or you could just make an audio CD
of your MP3 acapellas, and import them directly using Tracktion's import
from CD feature).
Once you've imported your acapella into Tracktion, simply "chuck it in"
anywhere and start playing, simply to get a 'feel' for whether this will
work or not. If it feels like there might be some mileage in getting this to
work, we need to sort out both the tempo and the pitch of the acapella...
and this is something Tracktion does very nicely indeed...
Before stretching or pitch-shifting, the easiest thing to do is to trim the
acapella so it's a neat 4 or 8-bar length and - most importantly - cut it
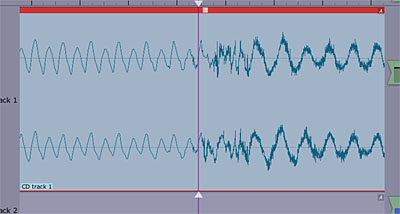
and fit it so it starts on an exact beat. Here's an example:
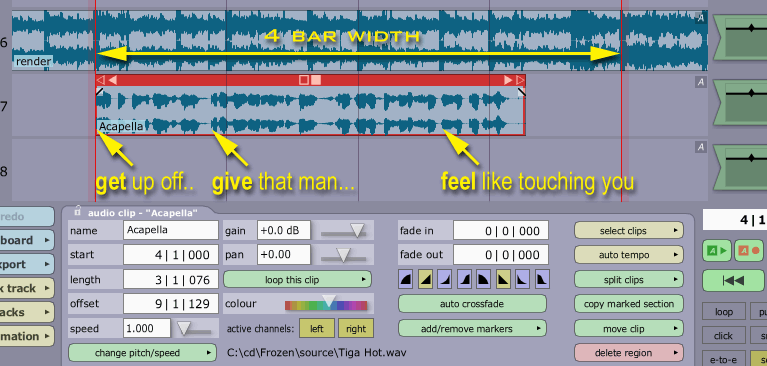
If you play the example above, you'll hear that although the
acapella section starts okay, it soon drifts out of time - coincidentally,
the pitch seems fine, but we'll worry about this later. On the diagram
above, key words in the acapella that should fall on the beat have been
highlighted. As can be seen from their waveform, they are all early, which
means the acapella clip needs to be slowed down.
To do this, simply hold down the [Alt] hardkey, and then
click-and-drag the outline triangle at the top-right corner of the Acapella
clip. This will stretch the clip by slowing it down, and you can see the
three key points in the waveform line up with the barlines (and the waveform
of the instrumental track above it). When it looks like it's in sync, play
it and have a listen - you can always nudge the speed property of the
clip by dragging the little triangle next to it:
Tip: For more accurate nudging of any Tracktion parameter (such as the
speed amount) hold down he [Ctrl] hardkey whilst click-and-dragging the
parameter's slider.
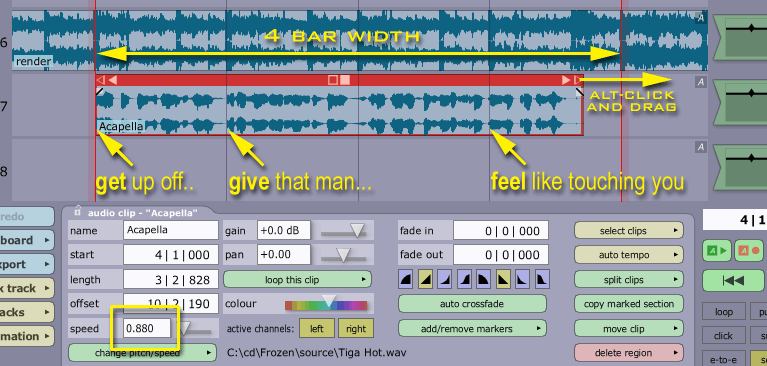
As can be seen above, the waveform of the Acapella clip now
lines up with the edit's barlines, so it's now in sync. As you can see from
the speed property (highlighted in a yellow square) the speed of the clip
has been slowed down to 0.880. THIS NUMBER IS IMPORTANT, AS IT'S THE
VARISPEED FACTOR FOR THE WHOLE OF THE ACAPELLA TRACK, NOT JUST THIS ONE
CLIP.
Finally, we need to sort out the pitch of the Acapella clip - by dragging
down Tracktion's Pitch-shifter and trying out different pitch-shift amounts
by ear until we get something that sounds good.
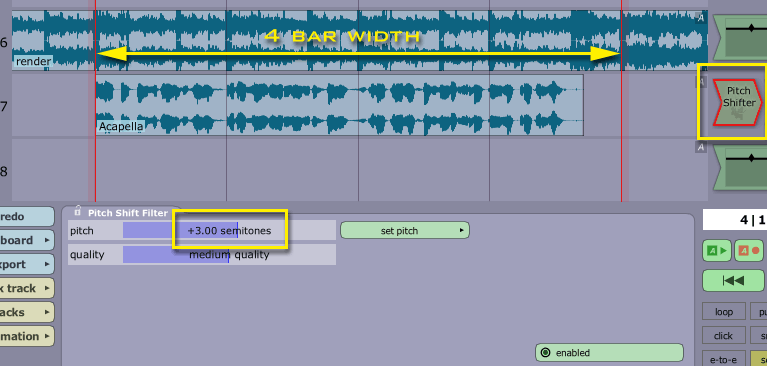
...and there you have it - if you click the diagram above
you'll hear a (preview-quality) MP3 of the Acapella clip varispeeded and
pitch-shifted to match the instrumental clip we made earlier! We can even
extend this Acapella section by simply dragging out more from the original
clip at the beginning or end - it'll all remain in sync and at the correct
pitch.
Adding more clips from this acapella is now relatively straightforward - we
know that each clip we add to this edit has to be varispeeded by 0.880 and
pitch-shifted by +3 semitones, so it's just a matter of cutting lines up and
sliding them around until they feel right!
Now get mashing...
*Edit by BCC - from KaZaa to Soulseek.